Bison Bone Broth
Bone broth is a kitchen staple in our home. When prepared correctly, this nutritious broth is full of essential minerals and collagen… your health and taste buds will thank you! Use as a base for soups, as a liquid for cooking, or anywhere a recipe calls for broth/stock. With health benefits aside, it will take the flavor of your food to another level of deliciousness. This recipe can be made in a stock pot, slow cooker or electric pressure cooker…

Raw bison bones (Soup bone, knuckle bone and marrow bones)
When making bone broth, I like to use a variety of bones for different reasons. Marrow bones add the nutrients of the marrow and flavor, knuckle bones add gelatin, and meaty bones (like soup and rib bones) add color, and most importantly flavor. Alone, this stock will store in the refrigerator for up to 1 week, or in the freezer for up to 1 year.
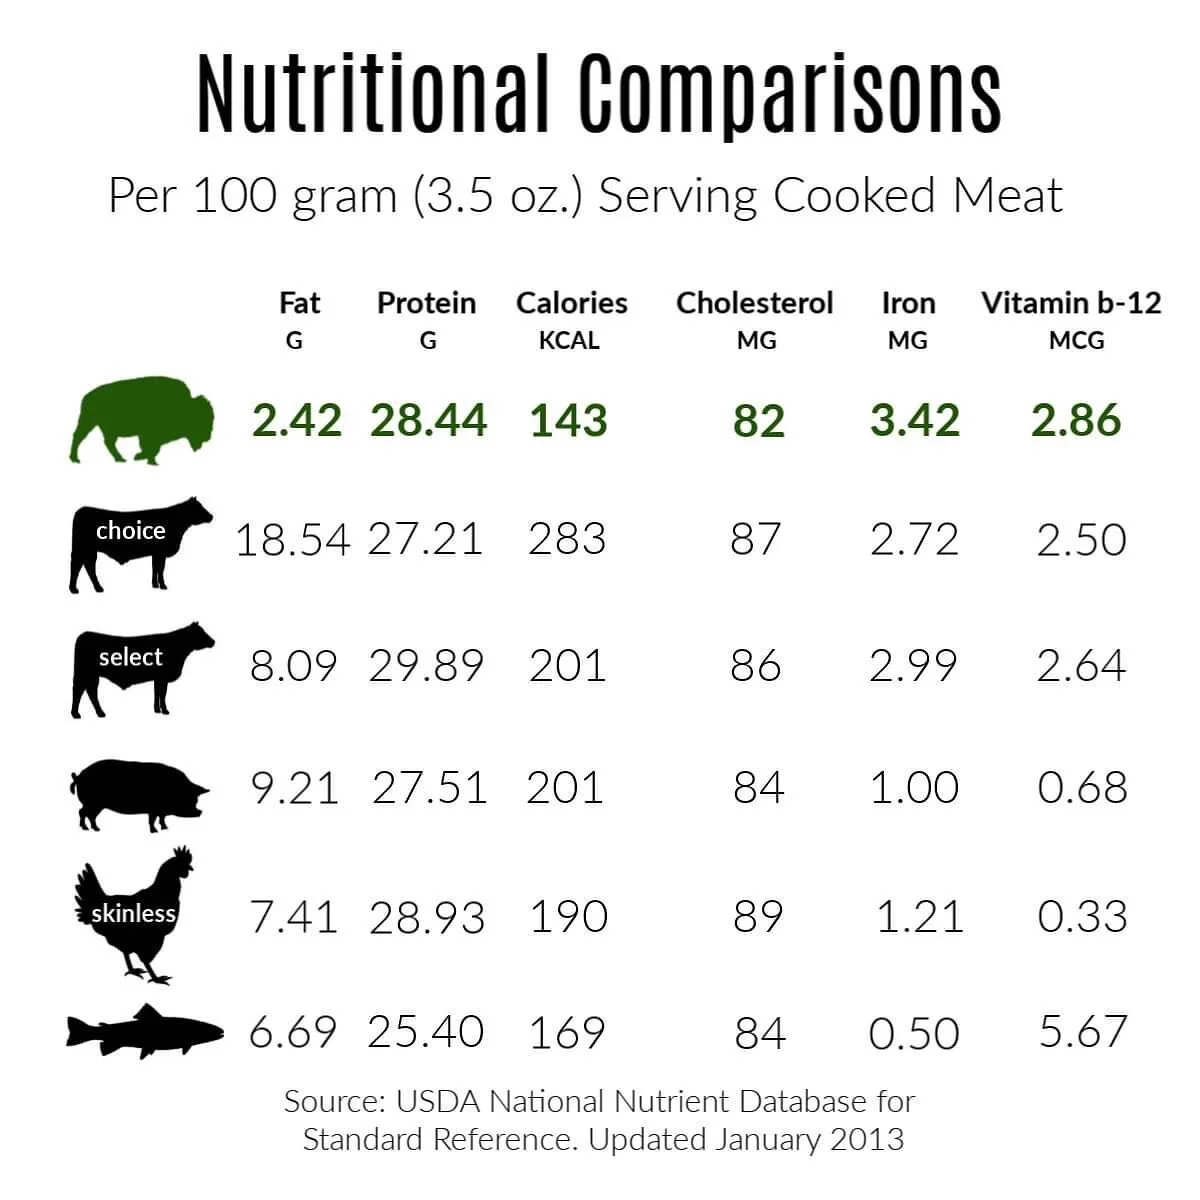
People have been making bone broth for its health benefits since the beginning of time. Adding something acidic like vinegar to your broth will help pull out essential minerals from the bones, particularly calcium, magnesium and potassium. The gelatin in the broth has been shown to aid in digestion, and to help assimilate other proteins in your diet. And collagen has been shown to support skin, bone and joint health. A quick google search will provide you with endless information. Skeptical? I was too. While there hasn’t been any medically based, peer reviewed studies showing these benefits in a measurable form, the good news is there are no risks to drinking it. So you have absolutely nothing to lose, and a lot to gain. And like I said above, health benefits aside, you can’t buy a more savory broth than this. Your taste buds and anyone you are cooking for, will thank you.
Bison Bone Broth
Makes approximately 3-4 quarts
Ingredient amounts will be approximate depending on how large your pot, slow cooker or electric pressure cooker is.
1-2 bison knuckle bones
1-2 bison marrow bones
1-2 bison meaty bones (soup bones or meaty rib bones)
1 Tbs oil (I like avocado oil)
1/2 cup apple cider vinegar
1-2 onions quartered
2-3 large carrots coarsely chopped
2-3 stalks celery coarsely chopped
a few sprigs of fresh thyme
1 tsp dried peppercorns
any dried herbs of your choice
Roast the meaty bones. This step can be skipped if you are in a hurry (I usually am!). But remember, color=flavor. If you are able to roast your meaty bones, it will add even more flavor to your broth.
Preheat oven to 350F. Pat dry meaty bones and rub with 1 Tbs of oil. Roast in a shallow roasting pan or cast iron skillet until browned. Turn once to brown both sides. You aren’t looking to fully cook your meaty bones, you just want that delicious brown crust for flavor.
Soak in vinegar. Add all of your bones to your pot, along with your veggies and seasonings. Add 1/2 cup of vinegar and cover with cold water. Be sure to leave at least 1 inch from the top of your pot to allow for expansion and simmering. Let soak for 30 minutes-1 hour.
Simmer.
Stock pot on stove: Simmer your broth on low for 12-48 hours. After 1 hour skim off any foam or impurities that come to the surface and discard. You want your broth to barely bubble/simmer, you don’t want it to boil. Keep an eye on your pot and make sure your water doesn’t evaporate too much, which will cause your ingredients to burn. Add water if needed.
Slow cooker: Simmer your broth on low setting for 12-48 hours. After 1 hour skim off any foam or impurities that come to the surface and discard.
Electric pressure cooker: Cook under pressure for 60-90 minutes. Let pressure release naturally when cooking time is complete.
Strain and cool. Strain the finished broth into a bowl or another pot and refrigerate until completely cooled. Once chilled, remove the top layer of fat that will have formed on top of your broth.
Store. Divid into jars and store in the refrigerator up to 1 week. You can also freeze your broth in handy portions. I like to freeze mine in 5 cup portions in freezer bags laying flat for easy thawing. Freeze for up to 12 months.
Enjoy!
Some quick notes:
Your broth turned to jelly!.. If your broth cools and turns to jelly, that is GOOD! Ideally your broth will turn to gel when cooled. This is living proof that your broth is full of all of that good-for-you gelatin/collagen. When heated, it will go right back to liquid. If your broth does not thicken when cooled, or turn to gel, don’t fret, your broth is still extremely nutritious! Next time, to get the ideal jelly result try these tricks…
Use more joint bones like knuckle bones. These bones are full of jelly gelatin goodness.
Simmer longer to get the most out of your bones.
Don’t skip the vinegar soak.
Use less water.
Make fumet…If using a stock pot on your stove, you can continue to simmer your stock down to a syrup like concentrate. This reduced, concentrated stock is called fumet. You can divide your fumet into zip lock bags and freeze. Simply thaw a baggie of fumet and add water, and you have broth! This is sometimes an easier way to store your broth, as it takes up less space in your freezer.
Enjoy the marrow… After straining your stock, don’t let the left-over marrow go to waste. Scrape the marrow out of the marrow bones and spread on bread. It’s delicious and nutritious. My husband is always the first in line for the marrow.